Website migration is no joke. It takes too much work, risks, and step to completely migrate your site into a new environment. And for the most part, web developers forget to consider the SEO elements of the company.
SEO is an essential element of a website’s digital marketing strategy. And without it, your company’s search ranking could plummet, resulting in low traffic and conversions. You could use your entire lead in just a tiny mistake.
So, whether you are building a better website or just simply fixing your current one, here is a complete guide for beginners in website migration, focusing on SEO.
What is website migration?
Before getting right into the website migration steps, it’s first essential to learn what website migration is and the different types.
Basically, website migration is moving your website from one environment to another. It could be changing your domain name, moving to a new website platform, or moving to a new host. Usually, website migration impacts several website elements such as URL structure, venue, layout, content, architecture, and more.
Website migration likewise has different types as follows:
- Hosting change – You need to migrate all your site files and database to the new server when changing your site host. Just make sure that your website migration is seamless and all capabilities of your old host are available to your new host. Check the capabilities of different web hosting platforms before Migration.
- Domain name change – Sometimes, the business has to change its domain name due to rebranding or acquisition. The technical part of domain change is easy. You can point the new domain name to the webserver. However, you need to ensure that all of your site, links, subdomain would not lead to 404 errors after the Migration.
- Protocol Change – Security of your Website is a must for any business. Not only does it secure your website, but it also promotes brand confidence. Protocol changes are done when Migration your Website from HTTP to HTTPS.
- E-commerce re-platforming – At times, businesses need to migrate their website to a new eCommerce platform to accommodate their unique needs and update their legacy system. An excellent example of re-platforming could be switching from WordPress to Shopify.
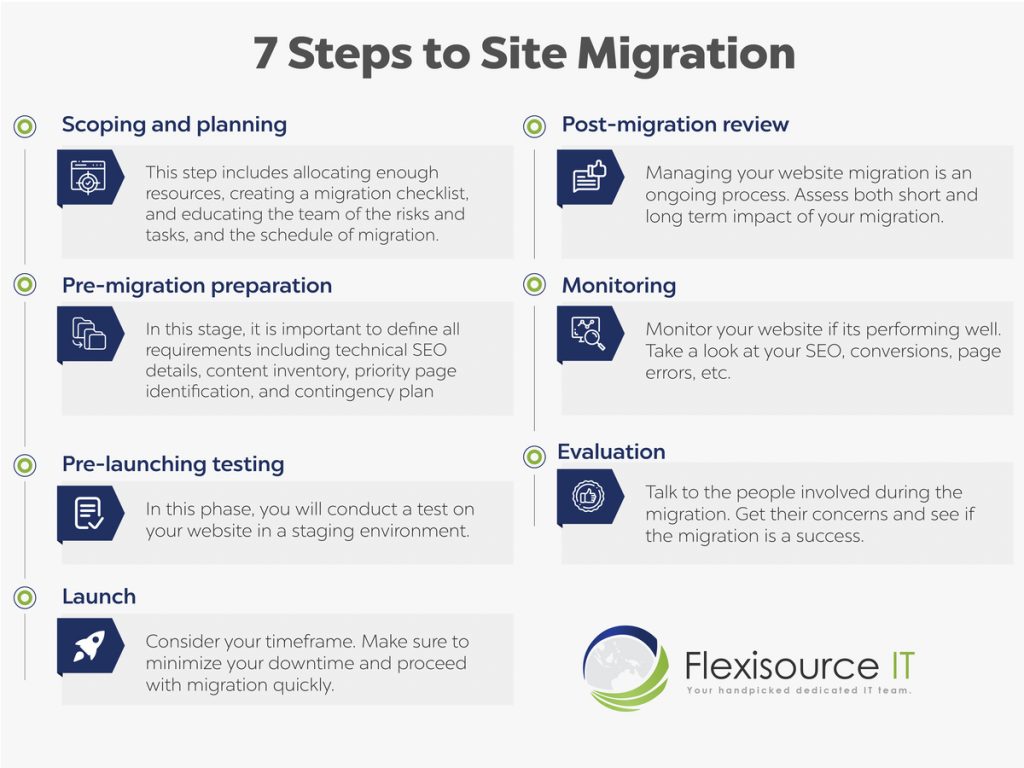
7 Easy Steps in Website Migration
Making significant changes to your website is an intimidating and arduous task. We recommend avoiding any website migration unless it’s totally needed. Losing a lot of your SEO efforts in website migration could not be worth it. Not to mention the downtime that could affect your overall marketing, sales, and business.
But since you are reading this article, it is probably inevitable. Thus, here is a walkthrough of website migration steps:

1. Scoping and planning
Before starting your website migration, you first need to know where to start. You need to allocate all resources, create a website migration checklist, and educate yourself and the team on the risks of Migration. This step also includes dividing tasks among the group and possible schedules for the Migration. Here are a few things to remember where to start:
- Define the Project Scope and Objective – It is critical to set a clear objective and goals when migrating your website. It identifies what you want to achieve, assesses and avoids potential risks, and takes precautions accordingly. In addition, your scope and objectives will define the tasks of each team member as it covers what needs to be done. Check out the website migration project plan template online to start.
- Set a Deadline – Deadline is also another critical part of Migration. Be sure that you start the Migration based on your timeline to avoid more extended downtime and more significant consequences to your business. Conduct the Migration as quickly as possible.
2. Pre-migration preparation
After making the overview of your plan, it is now time to define all requirements for your Migration – including the technical SEO details, content, page identification, and contingency plan. Basically, in this stage, you are creating your website migration strategy and backing up your website overall. Here are a few things you need to do in the pre-migration preparation stage:
- Audit your website’s SEO Technical Elements– Site migration often changes most of the site’s structure, including URLs, Backlinks, Titles, and Meta Description. So make sure you have a backup of these elements to avoid external and internal links going to non-existent URLs or visitors facing 404 errors. Remember that using the old URLs is essential as changing them might affect your SEO link-building efforts.
- Specify Metrics and Benchmarks – You also need to have a good overview of how your site is currently performing in SEO, traffic, ads, and other technical aspects. You can use these metrics as a backup on how you can improve your new website once it’s migrated. Check out this SEO website migration checklist to see what you need to keep track of.
- Update Canonicals – Another error that Migration usually does is creating multiple versions of the same page. This may affect your SERP ranking in the future as the AI could not determine which one to rank. As such, make sure to update your canonicals to ensure Search Engines will only show the page you intend to offer.
- Check Web Accessibility – Accessibility is essential, especially if you make significant design changes. Always check broken images, site navigation, space issues, etc.
3. Pre-launching testing
Remember not just downright launch the Migration. First, conduct a test on your website in a staging environment.
After making all necessary arrangements, try to put everything to a test and do premigration testing to ensure that you are ready and do not miss anything. This will help you prevent any error on the actual site that might affect your Migration and lengthen your downtime.
Likewise, here are some pre-launch testing aspects you need to check on:
- Test redirects – See whether your redirect is actually implemented and working okay. As mentioned earlier, Migration might change your URLs. As such, it’s essential to check for the following:
- 404 URLs that are present
- Links are not redirecting to the new site
- Check if there are any HTTP errors and redirect them to HTTPS
- Check if the www. Redirections have been conducted.
- Titles, meta descriptions, and headings – Make sure that these elements are still aligned with your SEO strategy.
- Conduct a content audit – See if any pages are missing any content.
- Set up a Robots.txt file – When setting up a staging website, you need to make sure that Google will not crawl your staging site. It can hurt your company’s brand image or might rank your staging site instead of your new website. To do this, you need to set up a robots.txt file and add a “Disallow: /* line.
- Triaging any issues – After conducting the pre-migration testing, list all the issues you faced during the test. Determine if these issues will cause any more significant problems or block your site release and check how they can be fixed. Pushing back the release date can be costly. Make sure it won’t be delated and resolve any issue at this stage.
4. Launch
After taking care of all the pre-launch items above, then you’ll be ready to launch your Migration. Always remember and follow your website migration plan and consider the timeframe. Make sure to minimize your downtime and proceed with Migration quickly.
5. Post-migration Review
Managing your website migration is an ongoing process. Don’t celebrate yet! Assess both the short and long-term impact of your website migration process. Decide whether the launch went well or whether you need to roll it back.
Work on your checklist above and ensure that all your goals are achieved. Similarly, check the following parts of your website:
- Test top-performing pages – Test if all your top-performing pages are working correctly and have the right content.
- SEO checks – Go through all the SEO requirements you listed. Make sure that everything is in order and nothing is missing.
- XML Sitemaps – As part of the SEO check, you ensured that the new XML sitemap would be correct. You need to make sure that the XML sitemap from your old website is still accessible in your old domain. Thus, the search engine can easily follow your pages quickly.
- Robot directives – Make sure that your new website has updated robots.txt and meta robots. As mentioned earlier, we prevented Google from crawling our website using the “Disallow: /” directive. It is important to set up a new robot directive by removing the “Disallow: /” and changing the meta robots setting from “noindex, nofollow” to “index, follow” on almost every page.
6. Monitoring
At this stage, you need to monitor your website to see if it’s performing well. Take a look at your SEO, conversions, page errors, etc. Check your Migration’s overall benchmark and goals and see if every plan is made. Analyze the web analytic data from the new site and compare how it is now.
7. Evaluation
After executing the overall migration plan, talk to the people involved. Get their concerns and see if the website migration was a success.
Ready to start your website Migration?
Website migration takes a massive undertaking to conduct. You are bound to face several issues during the process. Remember that it can quickly be addressed with proper understanding and knowledge. Don’t get discouraged when you fail the first time.
But if you want it professionally done, Contact Flexisource IT right away. We are an expert in website migration services.


